|
|
|
The deployment can be divided into three major phases: database deployment, client installation, and post-installation configuration.
Database Deployment
The default behavior for the setup application is to create a new database on SQL Server in the default database location as defined on SQL Server. If you would like more control over the database design, layout, or storage location you may create a blank database in SQL Server prior to running the setup application. If you create your own database, ensure that the user performing the application installation has db_owner access to the database during installation to populate the necessary schema objects. During installation a SQL Standard login will be created by the setup application. You may disable this login after the installation is complete if you wish to use Windows integrated security.
Client Installation
To perform an installation of pasGuard you must be logged on to the machine where the UI will be installed with administrative access. If you are running on a machine that includes the Windows User Access Control (UAC) it is recommended that you run the installation program as an administrator. Follow the steps below to install pasGuard:
•If a prior version of the application is already installed it must be removed before a new version is installed.
•The pasGuard database connectivity settings are stored in the pasGuard.exe.config file in the application folder - you should back this file up before uninstalling.
•The pasGuard system configuration settings and object definitions are stored in the database and will not be lost by uninstalling the application.
•Navigate to the media installation folder and run the pasGuard.msi application installation program.
•You must accept the license agreement to complete the installation.
•The default installation folder for pasGuard is in the 32-bit program file folder: %PROGRAMFILES%\PAS\pasGuard
•Approximately 10MB of storage is required.
•When you launch pasGuard for the first time you may receive an error message dialog similar to that pictured below for any of the following reasons:
•The pasGuard database has not been created.
•The pasGuard database exists but has an old version number.
•The database connection string in the application configuration file is incorrect.
•Your logon does not have access to the pasGuard database.
•The pasGuard Connection Security has not been configured.
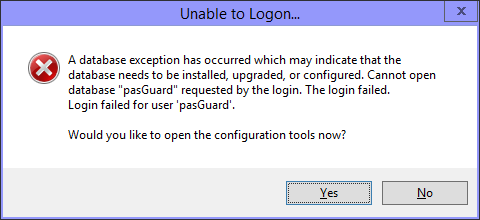
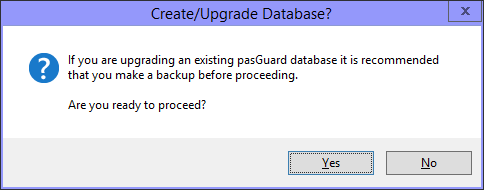
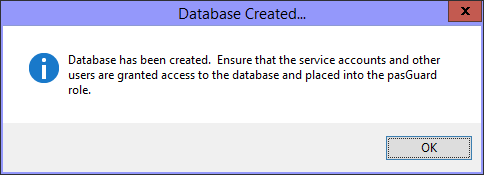
•If the pasGuard database does not yet exist, you will need to navigate to the Database Upgrade tab and specify a destination SQL Server instance to install the database on and the credentials of a user with system administrator privileges on the SQL Server instance to perform the installation. Click Install to create or update the database. Upon completion you will receive a confirmation that the database has been created or upgraded appropriately and you may then connect and continue.
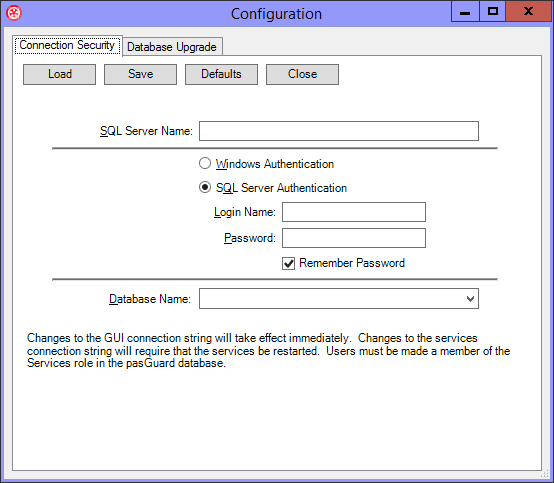
•You will be prompted for server name of the SQL Server where the database resides or will be created and the name of the database itself. The server can be a standalone server, named instance, or a clustered instance.
•You will be prompted for the name of the database. The default is pasGuard. If the database exists, the installer will populate/upgrade the schema in that database. If it does not exist a new database will be created.
•You will be prompted for the name and password of the default login that the pasGuard services and UI will use to connect to the database. The default user name is pasGuard and the default password is P@ssw0rd and if you wish to change either you must manually create your SQL Server login AFTER the setup program has created the database for you and place it in the Services role in the SQL Database. If you wish to use integrated security you may leave these fields blank.

•In the event that you are unable to connect to the database and you are certain that the database exists and you have access to it the problem may just be that you need to configure the connection string. To do so navigate to the Connection Security tab. Click Load to populate the default settings. You may then make changes to the existing settings and press Save to store them to the configuration file. The default settings are pictured below. The most frequent deviation in settings is to change the SQL Server name to a network location and the authentication mode to Windows Authentication.
•You will be prompted for server name of the SQL Server where the database resides or will be created and the name of the database itself. The server can be a standalone server, named instance, or a clustered instance.
•You will be prompted for the name of the database. The default is pasGuard.
•You will be prompted for the name and password of the default login that the pasGuard services and UI will use to connect to the database. The default user name is pasGuard and the default password is P@ssw0rd.
•NOTE: It is highly recommended that you disable the pasGuard logon and use Windows Authentication to authenticate. Additionally, a SQL Server administrator should assign any group or user logon principles membership in the Services database role which is required to use the application.
Activation
•After installation completes you must activate your copy of pasGuard. First open pasGuard as shown below.
•From the Help menu choose Licensing... to activate your license. For details on installing and managing licenses see the Licensing topic.
•Installation and Activation are now complete and you may begin using the application features.
Copyright © 2026 pasUNITY, Inc.
Send comments on this topic.